33 Writing Directly in Pressbooks
Writing your book directly in Pressbooks is arguably one of the easiest ways to assure your book is well-formatted. Plus, it gives you the added benefit of using platform as a tool to organize your book. In this chapter, you will learn:
- How to write directly in Pressbooks
- How to use the visual editor and text editors
- How to make your formatting look its best
1. Write Your Book in Pressbooks
- Log in to Pressbooks.
- At the top left of your dashboard, click on My Catalog and navigate to the book you would like to work in.
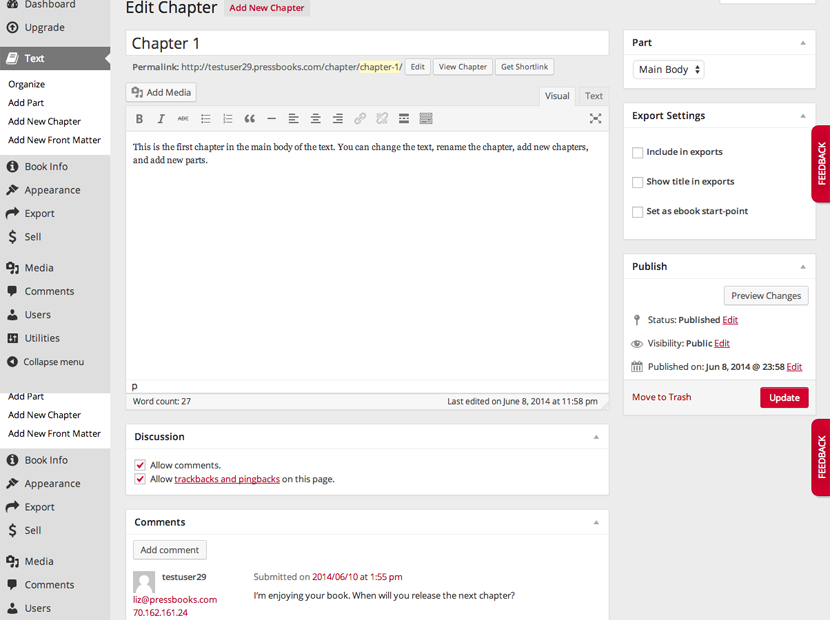
- Click on Text and Organize. Pressbooks lets you divide your book into parts and chapters.
- Once you’ve added some parts and chapters, click on the chapter you would like to work in.

- Add a title.
- Under the top right widget, tell Pressbooks what Part to organize your chapter under. (You can change this anytime.)
- The checkboxes in Export Settings let you include or exclude the chapter from your exports, show or hide the title in your exported files or set the chapter as the start point for your ebook.
- Write your chapter directly in the text box.
- Beneath the main text box, decide whether to allow comments on that chapter or not (NOTE: comments must be enabled globally for this option to appear. Read more here.)
- If desired, specify an individual author for this specific chapter.
- When ready, either publish your chapter, schedule it to go live at a later time or make it a private draft by using the options under the Publish tab at the right.
- Be sure to click Update to save.
- If necessary, under Publish, you can browse through past versions of your chapter and revert to them.
- Once your chapter is published, see what it will look like to a reader on the Web by clicking on the View Chapter or View Post link (middle top).
2. Visual Vs. Text Editor
There are two ways to write your book in Pressbooks: using the visual editor or the text editor. You can toggle between these editors at any time by clicking on the Visual or Text tabs at the top right of the text box. (Be sure to click update before switching between these two in order to save your changes.)
The visual editor will apply the appropriate HTML and CSS code in the background to create a digital book while you use a visual formatting menu similar to that in word processing applications such as Word.
The text editor enables you to use HTML and CSS to style your book.
It’s also helpful when you want to review the “markup” that may be causing trouble spots in your layout. Learn more about good markup and bad markup.
3. Writing and Editing Tools & Keeping Your Formatting Clean
Most menu options in Pressbooks’ Visual Editor are self-explanatory and will be familiar to you. A few tips:

- Do not try to work within the text box of the visual editor to apply fancy formatting (such as bolding or enlarging headings). Instead, use the dropdown menus labeled Paragraphs and Formats to apply styles to your book. This will ensure the best and cleanest output.
- Also, if you are pasting from Word or another non-text editor, using the Paste from Text button to import your text. Using Paste from Text will clean up and remove any underlying problematic formatting such as span tags that may interfere with a clean output.

